
I make a batch of this most weeks because it fits into almost any meal without much thought.
This cheesecake factory red velvet cheesecake copycat keeps the familiar restaurant-style flavor, but uses simple home-kitchen steps you can repeat on a busy weeknight.
Most home bakers overcomplicate this dessert by trying to bake two separate layers and stack them. That creates uneven texture and risks cracking. The restaurant-style approach is simpler: you pour red velvet batter, add cheesecake filling in the center, then top with more batter. Everything bakes together in one springform pan at a low, steady 325°F for about 90 minutes.
The homemade version gives you control over sweetness and richness. You can adjust the cocoa depth, use less food coloring if you prefer a natural tone, and whip your own fresh cream topping instead of relying on stabilized frosting. The texture stays softer and creamier because you’re working with full-fat cream cheese and real eggs, not commercial stabilizers.
This cheesecake factory red velvet cheesecake copycat serves 12 generously, chills overnight, and slices cleanly when you use a warm knife. You’ll avoid the common mistake of cutting too soon, which smears the layers and ruins the presentation.
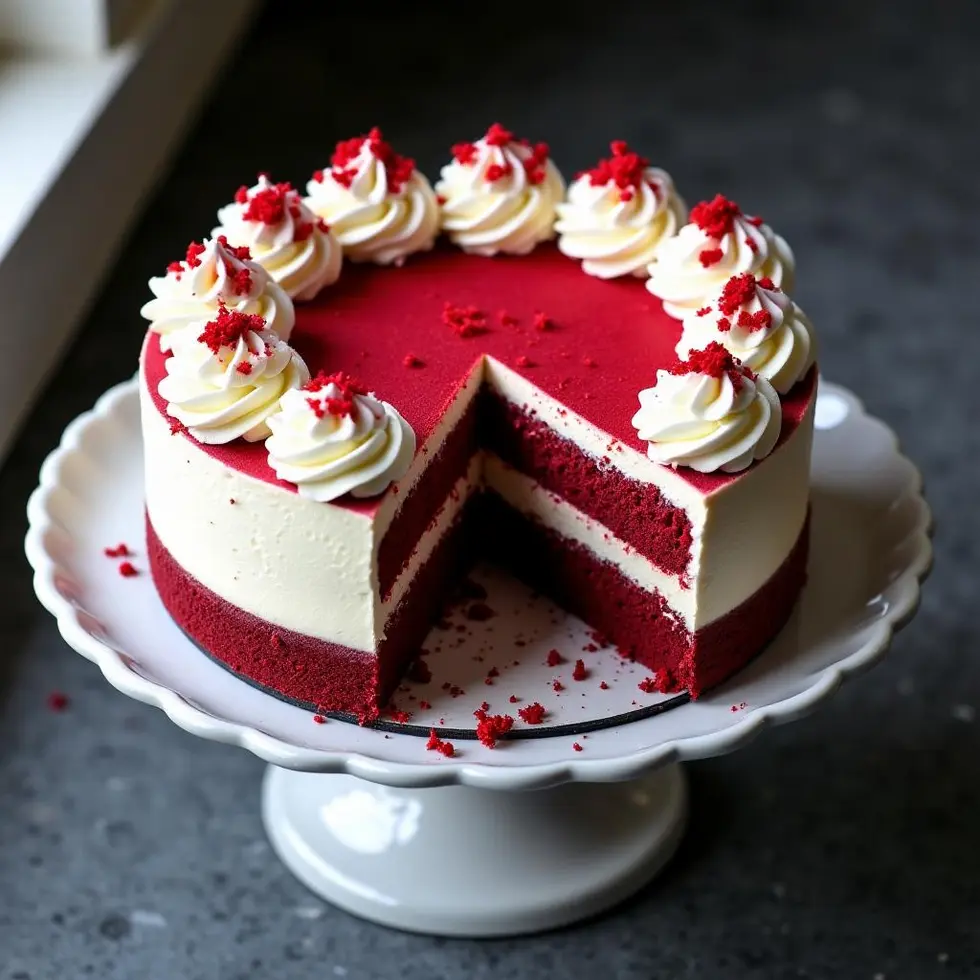
Why This Cheesecake Looks So Impressive

The Marbled Effect Happens During Assembly
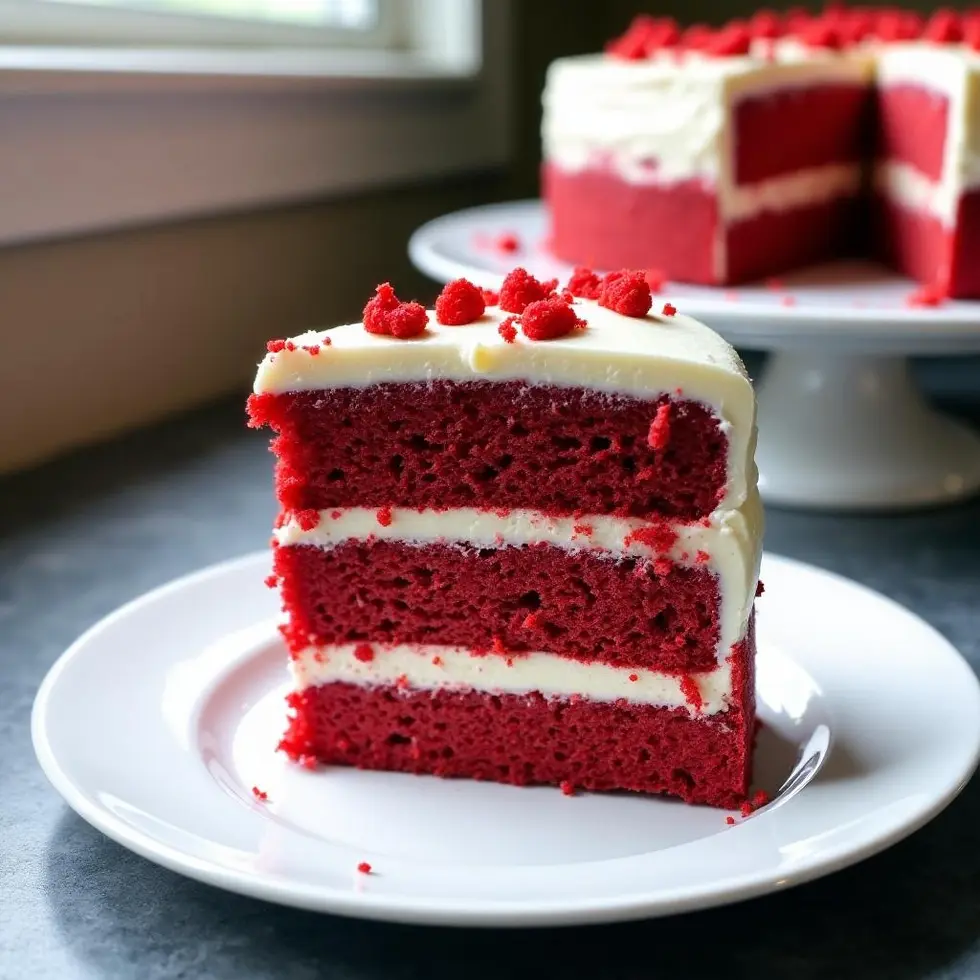
Restaurant-style layered cheesecake relies on gravity and timing. You pour half the red velvet batter first, then carefully spoon the cheesecake filling into the center without spreading it to the edges. The final layer of batter goes on top, creating a natural marble as the cheesecake sinks slightly during baking.
The contrast between deep red cake and pale cream filling creates that signature look. Adding extra cocoa powder to the cake mix intensifies the chocolate undertone and makes the red more dramatic. Most packaged red velvet mixes alone produce a pink tone, but two tablespoons of cocoa and one tablespoon of red food coloring push the color into true bakery territory.
Low Temperature Prevents Cracking
Baking at 325°F keeps the cheesecake layer from puffing and cracking. High heat causes eggs to expand too fast, which splits the surface and creates dry edges. The center should still jiggle slightly when you pull the pan from the oven after 85 to 90 minutes. That residual movement firms up as the dessert cools completely in the pan, preventing a sunken middle.
Most bakers make the mistake of opening the oven door to check doneness too often. Each time you do, the temperature drops and the baking time extends. Use the oven light and watch for a slight jiggle in the center without touching the pan until the timer goes off.
Once you understand the layering logic, the rest of the process becomes straightforward.
How to Build the Layers
Beat the Cream Cheese Until Smooth
Softened cream cheese at room temperature blends without lumps. Beat 450 grams of cream cheese with 200 grams of granulated sugar until the mixture looks smooth and pale, about two minutes with a hand mixer. Add three large eggs one at a time, waiting until each one disappears before adding the next. This method keeps the filling silky instead of grainy.
Most home cooks rush this step and end up with streaky cheesecake. Cold cream cheese won’t blend evenly, so let it sit out for at least 30 minutes before you start. If you’re exploring more restaurant-inspired desserts, you’ll find a full collection of Cheesecake Factory copycat recipes that use similar techniques.
Prepare the Red Velvet Batter with Extra Depth
Mix 300 grams of red velvet cake mix according to package directions, then stir in two tablespoons of cocoa powder and one tablespoon of red food coloring. The cocoa adds a subtle chocolate bitterness that balances the sweet cheesecake layer. The extra coloring ensures the batter stays vibrant during the long bake time.
Pour half the batter into a parchment-lined 9-inch springform pan. Spoon the cheesecake filling into the center, leaving about an inch of space from the edges. Top with the remaining batter, spreading it gently to cover the filling without pressing down. If you’re interested in the traditional red velvet cake technique without the cheesecake layer, this red velvet cake guide explains the classic frosting method.
Once the layers are assembled, the oven does most of the work while you focus on the final whipped topping.
Chilling, Slicing, and Serving
Refrigerate Overnight for Clean Slices
After the cheesecake cools completely in the pan at room temperature, refrigerate it for at least four hours, but overnight works better. Cold cheesecake slices cleanly without smearing the layers. Most people try to cut too soon and end up with a messy plate.
Run a thin knife around the edge of the springform pan before releasing the latch. This prevents the sides from sticking and tearing the surface. The parchment paper lifts the cheesecake off the base easily, so you can transfer it to a serving plate without cracking the bottom layer.
Whip Cream Fresh and Slice with a Warm Knife
Whip 200 milliliters of heavy cream to stiff peaks right before serving. Fresh whipped cream tastes lighter and less sweet than store-bought frosting. Pipe or spread it over the top, then slice using a sharp knife dipped in hot water and wiped dry between each cut. The warm blade melts through the layers without dragging.
Each slice should show distinct red and white layers with a fluffy cream topping. Serve the copycat dessert chilled, and store leftovers in the refrigerator for up to four days. The texture stays firm, and the flavors deepen slightly as the cocoa and vanilla blend overnight.
This layered cheesecake works for holiday gatherings, birthday dinners, or any time you want a bakery-style dessert without the bakery price.
Before You Start Cooking
Line your springform pan with parchment paper before you mix anything. This one step prevents sticking and makes cleanup faster. Most bakers skip it and end up scraping the bottom layer off the pan, which ruins the presentation.
Measure your cream cheese and eggs ahead of time so everything blends at the same temperature. Cold ingredients create lumps, and overmixing creates air bubbles that turn into cracks during baking. The biggest tip: trust the jiggle test at 90 minutes instead of overbaking until the center looks completely set.
Frequently Asked Questions
Can I use a different cake mix instead of red velvet?
You can substitute chocolate cake mix, but you’ll lose the signature red velvet flavor and color. The cocoa content will be higher, and the cheesecake contrast won’t look as dramatic. Stick with red velvet mix and add extra cocoa for the best result.
Why does my cheesecake crack on top?
Cracks happen when the oven temperature is too high or when you overbake the cheesecake. Bake at 325°F and remove the pan when the center still jiggles slightly. Cooling too quickly also causes cracks, so let it cool in the pan at room temperature before refrigerating.
Can I make this cheesecake without a springform pan?
A springform pan is essential for clean removal. Regular cake pans don’t unlatch, so you’d have to flip the cheesecake or scoop it out, which destroys the layers. Invest in a 9-inch springform pan for any layered cheesecake recipe.
How long does the cheesecake need to chill?
At least four hours, but overnight is better. The cheesecake layer firms up completely during refrigeration, which makes slicing cleaner and prevents the filling from oozing out when you cut into it.
Can I freeze leftover slices?
Yes, wrap individual slices tightly in plastic wrap and freeze for up to two months. Thaw in the refrigerator overnight before serving. The texture stays creamy, though the whipped cream topping may deflate slightly after freezing.
Red Velvet Cheesecake
Ingredients
Method
- Preheat the oven to 325°F / 165°C and line a 9-inch springform pan with parchment paper.
- Beat the cream cheese and sugar until smooth, then add eggs one at a time, followed by vanilla extract.
- Prepare the red velvet cake mix according to package directions, adding cocoa powder and red food coloring for deeper color.
- Pour half the red velvet batter into the pan, add the cheesecake filling in the center, then top with remaining red velvet batter.
- Bake for 85 to 90 minutes until the center is just set with a slight jiggle, then cool completely in the pan.
- Refrigerate for at least 4 hours or overnight before removing from the pan.
- Whip the heavy cream to stiff peaks and pipe or spread over the top before slicing with a warm knife.